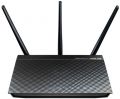
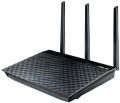
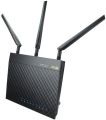
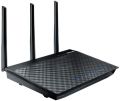
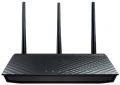
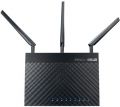
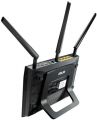
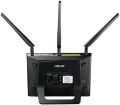
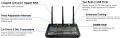
ASUS RT-AC66U
ASUS RT-AC66U A1 (1.30)
Availability: common
Manuf (OEM/ODM): Askey RT2320W -E61
FCC approval date: 30 May 2012
(Est.) release date: 10 June 2012
(Est.) initial retail price (in USD): $200
UPC: 886227214341 (UPC DB, On eBay)
Country of manuf.: China
Series: AC1750

Type: wireless router
FCC ID: MSQ-RTAC66U
IC ID: 3568A-RTAC66U
Power: 19 VDC, 1.58 A
Connector type: barrel
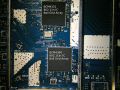
CPU1: Broadcom BCM4706 (600 MHz)
FLA1: 128 MiB134,217,728 B <br />1,048,576 Kib <br />131,072 KiB <br />1,024 Mib <br />0.125 GiB <br /> (Samsung K9F1G08U0D-SCB0)
FLA2: 2 MiB2,097,152 B <br />16,384 Kib <br />2,048 KiB <br />16 Mib <br />0.00195 GiB <br /> (Macronix MX25L1606EM2I-12G)
RAM1: 256 MiB268,435,456 B <br />2,097,152 Kib <br />262,144 KiB <br />2,048 Mib <br />0.25 GiB <br /> (Samsung K4T1G164QF-BCF7 × 2)
Expansion IFs: USB 2.0
USB ports: 2
JTAG: yes
Serial: yes, 3.3V TTL
WI1 chip1: Broadcom BCM4360
WI1 802dot11 protocols: an+ac
WI1 MIMO config: 3x3:3
WI1 antenna connector: U.FL, RP-SMA
WI2 chip1: Broadcom BCM4331
WI2 802dot11 protocols: bgn
WI2 MIMO config: 3x3:3
WI2 antenna connector: U.FL, RP-SMA
ETH chip1: Broadcom BCM4706
Switch: Broadcom BCM53125
LAN speed: 1GbE
LAN ports: 4
WAN speed: 1GbE
WAN ports: 1
abgn+ac
TPFirmware supported: AsusWRT-Merlin • (Wiki | List), DD-WRT • (List), FreshTomato • (List | DLs), Tomato (Shibby) • (List | DLs)
Flags: AiCloud support
Default SSID: ASUS (97 addl. devices)
, ASUS_5G (44 addl. devices)
Default IP address: 192.168.1.1
the IP 192.168.1.1 is used by 1297 additional devices
of which 167 are ASUS devices
Default login user: admin
Default login password: admin
admin:admin credentials used by 1321 additional devices
of which 198 are ASUS devices
802dot11 OUI: 08:60:6E (1 E, 1 W), 10:BF:48 (3 E, 4 W), 30:85:A9 (3 E, 3 W), 50:46:5D (2 E, 2 W)
Ethernet OUI: 08:60:6E (1 E, 1 W), 10:BF:48 (3 E, 4 W), 30:85:A9 (3 E, 3 W), 50:46:5D (2 E, 2 W)
| FCC ID | |
|---|---|
| ASUS RT-AC1750 | MSQ-RTAC66U |
| CPU1 brand | WI1 chip1 brand | WI2 chip1 brand | |
|---|---|---|---|
| ASUS RT-AC66U | Broadcom | Broadcom | Broadcom |
| ASUS RT-AC66U B1 | Broadcom | Broadcom | Broadcom |
For a list of all currently documented Broadcom chipsets with specifications, see Broadcom.
802.11ac Dual-Band Wireless-AC1750 Gigabit Router
"RT-AC66U" and "REV 1.30" is silkscreened on the (blue) board in the FCC photos.
This router is sold in various brick & mortar stores as the RT-AC66R and RT-AC66W..
The FCC label states the default SSID is ASUS.
FCC ID: MSQ-RTACHC00 (08/02/2016) (FCC Doc)
Links of Interest
News
- ASUS Reveals the Next Generation 802.11ac RT-AC66U Router on ASUS
- NETGEAR Suing ASUS For Wireless Hanky Panky on SmallNetBuilder
Reviews
- 10:BF:48 OUI on the label in the internal photos
- UPC: 886227214341, EAN: 4716<?>4342,
- OUI: 10:BF:48, rev. A1, mfg. year 2012
- CPU: Broadcom BCM4706KPBG MIPS74K, @600MHz
- Flash: Samsung K9F1G08U0D-SCB0 128MB, SLC
- RAM: 2x Samsung K4T1G164QF-BCF7 256MB, DDR2 @800MHz
- 2.4GHz: Broadcom BCM4331KMLG + 3x PA (E0GB 2AKC 216A)
- 5GHz: Broadcom BCM4360KMLG + 3x PA (5003L1 210ED 1210)
- SiGe SE5003L, 23dBm (200mW) Datasheet
- Switch: Broadcom BCM53125SKMML 1GbE
Forum threads
- New ASUS RT-AC66U router (5G 802.11ac) on wl500g.info
- On the DD-WRT forums (w/ DD-WRT test build and internal images
- posted by Magnetron1.1 [hosted on Mediafire], official support added
- in build 20873 - 20130308 per the DD-WRT wiki)
- 50:46:5D OUI on a label shot in the thread
- 08:60:6E OUI on a DD-WRT build shot in the thread
- A later revision A2 model in the thread has "RT-AC66U" and "REV 1.60"
- silkscreened on the board.
- Serial log indicates the device has an additional 2MB Serial Flash chip
Flashing
| NOTE: During configuration or flashing a device, the only things that should be hooked to the device is the computer and power. |
Flashing DD-WRT
- Download firmware image here
- Set static ip of 192.168.1.7
- reset to defaults in Asus GUI or in recovery mode
- In recovery mode, upload BrainSlayer's file
- Give the router plenty of time to flash and reboot.
- Once able browse to 192.168.1.1, if you see the change password screen of dd-wrt then
- do a hard reset which puts the router in recovery mode, select erase nvram and reboot.
- If you donot see the change password screen start over from step 1.
Flashing Tomato
| • ASUS Tomato Flash Guide |
|---|
| Source
Note: some people say you need to install DD-WRT first. I do NOT recommend anyone to install DD-WRT first before installing Tomato on Asus routers.
Wiert Corner method
–jeroen TFTP methodPut the router into recovery mode, set a static IP address on the computer then run in the shell: tftp 192.168.1.1 binary put [filename].trx Wait several minutes while firmware transfers and router updates. Reboot twice, waiting 3 minutes
|
Upgrading
Updating DD-WRT
| • ASUS DD-WRT Upgrade Guide |
|---|
| ===Updating DD-WRT===
If dd-wrt is already on the router follow these instructions. If stock firmware is on the router follow the flashing instructions.
Important1: This Hard reset or 30/30/30 works fine for Asus router, but you do have to power cycle after the reset. Important2: After you flash the firmware, and before you do the hard reset, the router will be building some nvram settings. YOU MUST WAIT FOR THIS TO FINISH PRIOR TO DOING ANYTHING WITH THE ROUTER INCLUDING A HARD RESET. Usually, you can tell when this process is completed by the WAN light coming on, but it does take several minutes. Go have a beer. There are starting to be more and more people who BRICK their routers by not waiting until the nvram is rebuilt, PRIOR to doing a hard reset. YOU NEED TO WAIT! |
USB Info
DD-WRT USB
- The USB port is where you can connect an external USB hard drive or flash drive.
- Which can do a multitude of things. You can use in as a NAS, storage for a FTP
- server, use Optware to run external programs like torrent software, samba for
- sharing files to network, share a USB printer with network...
- The list of possibilities is long, it just takes a little research.
- ProFTPd is included in most the newer builds of dd-wrt.
- Check the features chart to be sure.
Tomato
TomatoUSB comes with file sharing, ftp server and media server built in.
Tutorial: How to set up NAS and Optware on Tomato FOR TOTAL NOOBS
Pictures
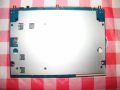
front
angled
angled2

back
angled3
front2
top
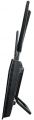
side
side angled
back
Details


Top view of System PCB
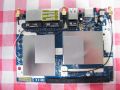
Top view without heat sink
Top view without heat sink, EMI shields, and 3 heat conductive foam tape pads

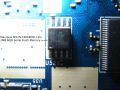
Closeup of Broadcom CPU
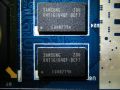
Closeup of Samsung SDRAM's

Closeup of Broadcom Ethernet Switch
Closeup of Broadcom 802.11 IC's
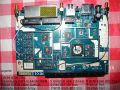
Bottom view of System PCB
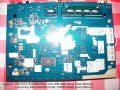
Bottom view without ground plate
Closeup of Macronix 2MB NOR Serial Flash Memory
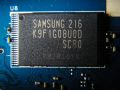
Closeup of Samsung 128MB NAND Flash Memory


Notes
jffs Issue in DD-WRT
This problem is caused by the firmware encountering an unmarked bad block during an erase operation while attempting to setup a JFFS2 filesystem on device /dev/mtd/4.
Most people will probably never experience this problem. The AC66U, the D1800H, and the Buffalo WLI-H4-D1300 Media Bridge use the same Samsung flash memory chip. In my case, 4 of my 5 D1800H's had the problem but my D1300 didn't. Neither of my AC66U's had the problem. One person on one of the AC66U threads reported having the problem; here's a link to his post.
If you have the problem, you will not be able to create or copy directories and files to /jffs. Here are some example error messages:(this list was shortened to save space - it can go on for several pages)
root@WZR-D1800HRT2:~# dmesg|grep jffs
jffs2: jffs2_scan_eraseblock(): Magic bitmask 0x1985 not found at 0x05ee0020: 0xe952 instead
jffs2: jffs2_scan_eraseblock(): Magic bitmask 0x1985 not found at 0x05ee0024: 0x0e6d instead
jffs2: Further such events for this erase block will not be printed
jffs2: Old JFFS2 bitmask found at 0x05efc7fc
jffs2: You cannot use older JFFS2 filesystems with newer kernels
jffs2: Cowardly refusing to erase blocks on filesystem with no valid JFFS2 nodes
jffs2: empty_blocks 379, bad_blocks 1, c->nr_blocks 760
Also the Status -> Router webpage will show that JFFS2 has no free space.
To fix this problem try the following at a command line prompt:
flash_erase -j /dev/mtd/4 0 0 && reboot
This command erases and marks bad any bad blocks encountered so that they can be "skipped"
- and formats the partition to JFFS2 specifications.
- I believe the firmware uses the mtd erase command which seems to fail at handling bad blocks.
- The flash_erase command needs to be run only once.
- Magnetron1.1
Trouble with recovery mode
I just want to give a tip for anybody who has trouble getting into recovery mode. I didn't find this simple information on the internet yet. First, some context:
I flashed a Brainslayer build from a Fractal build, and then my router stopped responding to ping. When booting normally, the power and ethernet LEDs would light up. The same thing happened when booting up with the reset button pressed, which should have put into recovery mode, but didn't. When booting up with the WPS button pressed, the power LED would flash and clear the NVRAM. The router then started up and enabled the two radios, broadcasting a "dd-wrt" SSID, but still no ping.
To force it into recovery mode:
   Set a static IP of 192.168.1.2
   Press the WPS button and start up
   Let the power LED flash rapidly for 5 seconds, then release WPS
   Immediately press the reset button, keeping it pressed until the power LED flashes slowly
   Release the reset button
   Point your browser to 192.168.1.1
Voilà.
revinfo
per comments on a commit on Oleg's wl500g Google Code repo
wl -i eth1 revinfo (BCM4331)
admin@RT-AC66U:/tmp/home/root# wl -i eth1 revinfo
vendorid 0x14e4
deviceid 0x4332
radiorev 0x2059000
chipnum 0x4331
chiprev 0x2
chippackage 0x8
corerev 0x1d
boardid 0xf5b2
boardvendor 0x14e4
boardrev P100
driverrev 0x61e271f
ucoderev 0x2f10071
bus 0x1
phytype 0x7
phyrev 0x1
anarev 0x0
wl -i eth2 revinfo (BCM4360)
admin@RT-AC66U:/tmp/home/root# wl -i eth2 revinfo
vendorid 0x14e4
deviceid 0x43a2
radiorev 0x32069000
chipnum 0x4360
chiprev 0x2
chippackage 0x1
corerev 0x28
boardid 0x621
boardvendor 0x14e4
boardrev P305
driverrev 0x61e271f
ucoderev 0x2f10071
bus 0x1
phytype 0xb
phyrev 0x0
anarev 0x0
See also
- ASUS RT-AC66R (Store by Best Buy)
- ASUS RT-AC66W (White)
