Linksys WRT54GS2
Linksys WRT54GS2 v1.0
Manuf (OEM/ODM): CyberTAN
FCC approval date: 23 January 2008
Country of manuf.: China
S/N prefix: CUQ01
Local image
Type: wireless router
FCC ID: Q87-WRT54G2V1
IC ID: 3839A-WRT54G2V1
PCB ID: 3763-14143002R
Power: 12 VDC, 0.5 A
Connector type: barrel
CPU1: Broadcom BCM5354 (240 MHz)
FLA1: 2 MiB2,097,152 B <br />16,384 Kib <br />2,048 KiB <br />16 Mib <br />0.00195 GiB <br /> (Macronix MX29LV160CTTC-70G)
RAM1: 16 MiB16,777,216 B <br />131,072 Kib <br />16,384 KiB <br />128 Mib <br />0.0156 GiB <br /> (Hynix HY57V641620FTP-7)
Expansion IFs: none specified
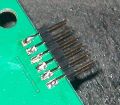
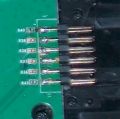
JTAG: yes, 12-pin header, unpopulated
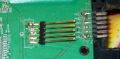
Serial: yes, 5-pad header, unpopulated
WI1 chip1: Broadcom BCM5354
WI1 802dot11 protocols: bg
WI1 antenna connector: none
ETH chip1: Broadcom BCM5354
Switch: Broadcom BCM5354
LAN speed: 100M
LAN ports: 4
WAN speed: 100M
WAN ports: 1
bg
Stock bootloader: BSP
Stock FW OS: VxWorks
Default SSID: linksys (50 addl. devices)
Default IP address: 192.168.1.1
the IP 192.168.1.1 is used by 1295 additional devices
of which 153 are Linksys devices
Default login user: blank
Default login password: admin
blank:admin credentials used by 289 additional devices
of which 142 are Linksys devices
802dot11 OUI: 00:23:69 (12 E, 19 W), 68:7F:74 (13 E, 16 W)
Ethernet OUI: 00:23:69 (12 E, 19 W), 68:7F:74 (13 E, 16 W)
| FCC ID | |
|---|---|
| Linksys WRT54G2 v1.0 | Q87-WRT54G2V1 |
For a list of all currently documented Broadcom chipsets with specifications, see Broadcom.
Wireless-G Broadband Router with Speed Booster
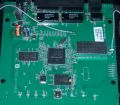
"3763-14143002R" is silkscreened on the board.
Links of Interest
- Listed on the WRT54G series page on Wikipedia
- On the DD-WRT wiki
- wrt54gs2 v.1 router - DD-WRT forums
- Linksys WRT54G2 v1.3 & WRT54GS2 v1.0 Now Supported
Flashing
| NOTE: During configuration or flashing a device, the only things that should be hooked to the device is the computer and power. |
Flashing DD-WRT
| WARNING: Requires Micro for DD-WRT, Do not flash anything else! |
| WARNING: Requires K2.4 for DD-WRT, Do not flash anything else! |
| ***Warning*** There is no Revert for this router at this time. |
- Configure your computer's local lan ethernet address to 192.168.1.10, subnet 255.255.255.0, gateway 192.168.1.1 . Then connect an Ethernet cable to your computer and port 1 of your router. (Do Not Use Wireless)(Nothing else connected to router)
- Perform a Hard reset or 30/30/30.
- Open your browser to http://192.168.1.1.
- Use the firmware upgrade dialog to flash Vxworkskiller-GS2V1.bin.
- WAIT for at least five minutes before you continue! (longer is better) Give vxworks killer plenty of time to do its magic!
- You will not be able to browse the WRT54GS2v1 at this point, but you should be able to ping 192.168.1.1. If the router doesn't reply you haven't set your computer's network settings correctly (on step 1)
- Tftp the DD-WRT firmware to the router, use latest dd-wrt.v24_micro_generic.bin from the folder where you got these instructions; after sucessful tftp, wait 5 min for the router to finish writing new nvram deafults, etc... It should reboot on its own at least 2 times, so give it 5 min and then go to http://192.168.1.1 (If it not reboot on its own, wait another 2 min, and then power cycle it) , you should see the password reset page. Don't worry about changing it at this point.
- Perform a Hard reset or 30/30/30.
- WAIT for at least 5 minutes before you continue! (longer is better) Give the router plenty of time to to boot.
- Browse 192.168.1.1, you should see the password reset page, change it! Then configure.
- Check for recommended builds here.
Reverting
Reverting to OEM Firmware from DD-WRT
| ***Warning*** There is no Revert for this router at this time. |
Upgrading
Updating DD-WRT
If dd-wrt is already on the router follow these instructions. If stock firmware is on the router follow the flashing instructions.
- Check for recommended builds here first.
- Set your computer to a static IP of 192.168.1.7. (or to whatever subnet the router is on) Disable all firewalls and security. Disable wireless on your computer and only have the router connected to the flashing computer by the ethernet cable between the two.
- Hard reset or 30/30/30 (If the router supports it, if not, reset to defults in the GUI) prior to flashing. Wait. Check for password page on re-login and change password.
- Flash firmware. You can use the webgui except if you have a belkin router. (For belkin use tftp.exe to flash)
- Wait...at least three minutes. Lights should return to normal. See important2, below. Failing to wait is how most people brick their routers.
- Do a power cycle of the router. (Unplug the cord, count to 30 and plug it back in.)
- Wait for the lights to return to normal usually about 2 minutes.
- Hard reset or 30/30/30 again (If the router supports it, if not, reset to defults in the GUI). Wait. Check for the password page and re-login to change the password. Then you can reconfigure your settings manually.
- Once configured set your computer back to autoIP and autoDNS.
Important1: This Hard reset or 30/30/30 works fine for Asus router, but you do have to power cycle after the reset.
Important2: After you flash the firmware, and before you do the hard reset, the router will be building some nvram settings. YOU MUST WAIT FOR THIS TO FINISH PRIOR TO DOING ANYTHING WITH THE ROUTER INCLUDING A HARD RESET. Usually, you can tell when this process is completed by the WAN light coming on, but it does take several minutes. Go have a beer. There are starting to be more and more people who BRICK their routers by not waiting until the nvram is rebuilt, PRIOR to doing a hard reset. YOU NEED TO WAIT!
JTAG-Serial Info
JTAG
JTAG Pinouts
 nTRST  1o o2  GND
   TDI  3o o4  GND
   TDO  5o o6  GND
   TMS  7o o8  GND
   TCK  9o o10 GND
 nSRST 11o o12 N/C
Using Universal JTAG Adapter
  white  1o o2  black
    red  3o o4  GND
   blue  5o o6  GND
  green  7o o8  GND
 yellow  9o o10 GND
 orange 11o o12 N/C
- /noreset switch required
DD-WRT JTAG Recovery
- JTAG:
- Backup CFE x2 (Compare the files, they must match exactly or there is something wrong with your JTAG setup)
- Erase Wholeflash x2
- Flash CFE
- Unplug Power
- Unplug JTAG Cable
- TFTP:
- Set Rig ip static 192.168.1.10
- Plug network cable from rig to port 1
- Get TFTP ready, server ip - 192.168.1.1, Password - blank, file - dd-wrt.v24_micro_generic.bin
- Plug in power
- As soon as windows says "connected" hit upgrade. May have to use a network hub to make sure windows is always connected.
- Hard Reset 30\30\30
Serial
Serial Pinouts
 VCC 1 o
  TX 3 o
  RX 5 o
 N/C 7 o
 GND 9 o
Hyper terminal Setup in Windows XP
In Windows XP, Click Start Button - All Programs - Accessories -
   Communication - HyperTerminal
Enter a name for the connection, Click ok
Choose com port you adapter is plugged into, Click ok
Set:
 Bits per second = 115200
 Data Bits = 8
 Parity = none
 Stop bits = 1
 Flow control = none
Click ok
Click File - Save As, and select a place to save it to so you
             don't have to enter the settings again.
Putty Setup in Windows XP
After installing putty, run it
 Serial line = The COM port your using for serial (ie. COM3)
 Speed = 115200
Click on Serial under Connection
 Serial line to connect to = same as above (Serial line)
 Speed (baud) = 115200
 Data bits = 8
 Stop bits = 1
 Parity = none
 Flow control = none
Click Session
 Enter a name for your connection under saved sessions
Click Save
Click Open
DD-WRT Serial Recovery
Modified Redhawk0 instructions
- Connect Serial cable
- Start one of the programs from above
- Get TFTP ready with file selected
- Use dd-wrt.v24_micro_generic.bin
- Connect power to the router
- start a rapid fire Cntl-C as you plug the router to power
- type "nvram erase" w/o quotes, hit enter
- type "flash -noheader : flash1.trx" w/o quotes, this starts the tftp daemon, hit enter
- but have tftp.exe ready
- Click go or start on TFTP
- give it 5 minutes after it finishes
- then power cycle....hard reset...then config
- when it stops spitting out txt in the serial consol....hit the enter key...
- you should get a login prompt...at that point, power cycle it, Hard reset or 30/30/30...then config
- you'll see it boot up
USB Info
No USB
Pictures
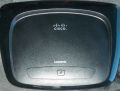
Top
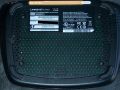
Bottom
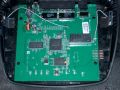
Board Top
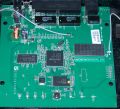
Chips
Chips2

JTAG
JTAG
JTAG
Serial & JTAG


