Linksys WRT54GS v7.0
Linksys WRT54GS v7.0
Manuf (OEM/ODM): CyberTAN
FCC approval date: 11 January 2007
Country of manuf.: China
S/N prefix: CGNA, CGNB, CGNC
Series: WRT54GS
Local image
Type: wireless router
FCC ID: Q87-WRT54GSV7
IC ID: 3839A-WRTGSV7
Power: 12 VDC, 0.5 A
Connector type: barrel
CPU1: Broadcom BCM5354 (240 MHz)
FLA1: 2 MiB2,097,152 B <br />16,384 Kib <br />2,048 KiB <br />16 Mib <br />0.00195 GiB <br /> (Intel JS28F160C3BD-70)
RAM1: 16 MiB16,777,216 B <br />131,072 Kib <br />16,384 KiB <br />128 Mib <br />0.0156 GiB <br /> (Mira P2V28540CTP)
Expansion IFs: none specified
JTAG: yes, 12-pin header, unpopulated
Serial: yes, 5-pin header, unpopulated, (115200 8N1)
WI1 chip1: Broadcom BCM5354
WI1 802dot11 protocols: bg
WI1 antenna connector: none
ETH chip1: Broadcom BCM5354
Switch: Broadcom BCM5354
LAN speed: 100M
LAN ports: 4
WAN speed: 100M
WAN ports: 1
bg
Stock bootloader: BSP
Stock FW OS: VxWorks
Default SSID: linksys (50 addl. devices)
Default IP address: 192.168.1.1
the IP 192.168.1.1 is used by 1295 additional devices
of which 153 are Linksys devices
Default login user: blank
Default login password: admin
blank:admin credentials used by 289 additional devices
of which 142 are Linksys devices
802dot11 OUI: 00:1A:70 (9 E, 15 W), 00:1C:10 (9 E, 16 W), 00:1D:7E (10 E, 14 W)
Ethernet OUI: 00:1A:70 (9 E, 15 W), 00:1C:10 (9 E, 16 W), 00:1D:7E (10 E, 14 W)
| CPU1 brand | WI1 chip1 brand | WI1 chip2 brand | |
|---|---|---|---|
| Linksys WRT54GS v1.0 | Broadcom | Broadcom | Broadcom |
| Linksys WRT54GS v1.1 | Broadcom | Broadcom | Broadcom |
| Linksys WRT54GS v2.0 | Broadcom | Broadcom | Broadcom |
| Linksys WRT54GS v2.1 | Broadcom | Broadcom | Broadcom |
| Linksys WRT54GS v3 | Broadcom | Broadcom | Broadcom |
| Linksys WRT54GS v4 | Broadcom | Broadcom | Broadcom |
| Linksys WRT54GS v5.0 | Broadcom | Broadcom | Broadcom |
| Linksys WRT54GS v5.1 | Broadcom | Broadcom | Broadcom |
| Linksys WRT54GS v6.0 | Broadcom | Broadcom | Broadcom |
| Linksys WRT54GS v7.0 | Broadcom | Broadcom | |
| Linksys WRT54GS v7.2 | Broadcom | Broadcom |
For a list of all currently documented Broadcom chipsets with specifications, see Broadcom.
Wireless-G Broadband Router with SpeedBooster
Links of Interest
- Linksys WRT54G series on Wikipedia
- Linksys WRT54Gxx page on DD-WRT wiki
- Linksys WRT54GS V7 Flashing Instructions
Flashing
| NOTE: During configuration or flashing a device, the only things that should be hooked to the device is the computer and power. |
Flashing DD-WRT
| WARNING: Requires Micro for DD-WRT, Do not flash anything else! |
| WARNING: Requires K2.4 for DD-WRT, Do not flash anything else! |
- Linksys WRT54GS-RM (CGNC) Same as Linksys WRT54GS v7.0
NOTE TO WINDOWS VISTA USERS: By default the TFTP Client is disabled and you SHALL NOT PROCEED UNLESS YOU HAVE ENABLED IT. To enable: click the Start orb and type the following into the Start Search field: "features" (Without the " " of course, but you have to tell some people). At the top of the Windows Start Bar, you will see "Programs and Features;" click on that. In the left pane of the new window, click Turn Windows Features on or off. Scroll down through the Windows Features until you see TFTP Client. Select the option box and press OK.
METHOD FOR EOC, INTEL, AND POSSIBLY OTHER FLASH CHIPS
- First download this file: dd-wrt.v24_micro_generic.bin
- You will also need: vxworkskillerGSv7-v3.bin
- Configure your local LAN Ethernet address to 192.168.1.100 and connect your local Ethernet to your WRT54GSv7 on one of the four switch ports. Do not use a wlan connection!
- GNU/Linux: How to configure your LAN Ethernet address to 192.168.1.100
ifconfig eth0 192.168.1.100
- Microsoft Windows: How to configure your LAN Ethernet address to 192.168.1.100
- Click Start
- Click Control Panel
- Double Click Network Connections
- Under LAN or High-Speed Internet Double click the enabled device (the Local Area Connection or the Wireless Network Connection)
- On the Status Box Window that opens Click the Properties button
- Drag the Properties window beside the Status window
- Click the Support tab on the Status window
- Click the Details button—this window provides the information you will need to manually configure your IP
- In the Properties window that you have open beside the Status windows scroll down through the devices until you get to Internet Protocol TCP/IP
- Select Internet Protocol TCP/IP and click the properties button
- In the Properties window that opens select "Use the following IP address"
- If you have a number of machines begin by setting the IP address to 192.168.1.100 then go to 192.168.1.101 and so forth giving each machine a unique IP on the network
- The subnet mask has a default value of 255.255.255.0 in most cases.
- GNU/Linux: How to configure your LAN Ethernet address to 192.168.1.100
- Disconnect the power cord from the WRT54GSv7.
- Push the reset button while reconnecting the power cord and hold the button for about 20 seconds.
- Open your browser to
http://192.168.1.1/ - Use the Firmware upgrade option under the Administration tab to flash vxworkskillerGSv7-v3.bin.
- After the dialogue about disconnecting the power cord is shown, disconnect the power cord and reconnect it.
- Wait for FIVE FULL minutes.
- Again, disconnect the power cord and reconnect it.
- Transfer the firmware using TFTP
- Using GNU/Linux
tftp -v -m octet 192.168.1.1 -c put dd-wrt.v24-micro_generic.bin
- Using Microsoft Windows
- If you're using Windows Vista or Windows 7, you need to first enable the tftp client
- Start up a Windows console by pressing Alt+F2 and typing "cmd" and press enter
- Enter "tftp -i 192.168.1.1 put dd-wrt.v24_micro_generic.bin" on your local Windows console and press enter.
- Using GNU/Linux
- The file will now be transferred and flashed to your router. After this is done, your router will boot automatically and you can reach it at
http://192.168.1.1./ - Check for recommended builds here.
(Note: My WRT54GS V7.0 didn't boot automatically, and simply power-cycling didn't bring it up. Resetting as described in steps 4-5, holding reset while plugging in the power cord, brought the router from "no lights, no web interface" to "functioning dd-wrt install.")
ALTERNATE METHOD TO FLASH DD-WRT ON A WRT54GS v7 WITH AN INTEL FLASH CHIP
I just loaded DD-WRT v24 RC7 on two of the WRT54GS v7 with an Intel flash chip.
- I used the latest vxworkskiller. Below are instructions.
Intel flash chip says JS28F160, C3BD70, and A7397147.
- Router is dated December 2007. S/N starts with CGNC.
- Manually configure your IP to 192.168.1.10.
- Reset router to factory defaults.
- Update firmware to vxworkskillerGSv7-v3.bin, the update will finish.
- Watch the lights on the router. Wait until the Power light is solid, then unplug the router.
- Plug the router back in.
- Get "tftp -i 192.168.1.1 PUT dd-wrt.v24-micro_generic.bin" ready in a command prompt and hit enter.
- After the tftp is finished wait and watch the router lights.
- The Power light will eventually come one.
- Shortly after that the WLAN light will come on.
- Try to load the web configuration page about 5 seconds later; you're done!
- Check for recommended builds here.
Another similar method to flash WRT54G v8 and WRT54GS v7.2 (possibly other 7.x)
I've been doing something slightly different on WRT54G v8 and this WRT54GS v7,
- it hasn't failed me yet, below are the instructions.
I have done this on a countless number of WRT54G v8s and just did it on a WRT54GS v7 and it worked just the same.
- There is no resetting in the middle of this process, just do exactly what it says below, no more and no less.
My WRT54GS v7 has a Broadcom BCM5354KFBG CPU and an EON EN29LB160AB-70TCP flash chip and 16MB of Samsung RAM.
- The FCC ID is Q87-WRT54GSV72 which maybe means it's a v7.2? Serial number starts with CGNE.
[Addition: tiger12506 adds that he has succesfully performed this on two WRT54GS v7.2 with CGNE serial numbers. He felt that it was impossible, that he had bricked one of the routers at first. Messing around with JTAG cables taught him some things, but... be sure(!) Be absolutely sure that you have tftp set to binary or octel. If you leave tftp in ascii it will appear to work but the flash won't take.]
- Use the web interface to reset the router to factory defaults.
- Manually configure network interface to 192.168.1.10. (Any address from 192.168.1.2 - 192.168.1.254 should work)
- (In linux, this is sudo ifconfig eth0 192.168.1.10)
- Use the web inferface to update the firmware to vxworkskillerGSv7-v3.bin.
- tftp -i 192.168.1.1 PUT dd-wrt.v24_micro_generic.bin (Windows only)
- [For linux users: use tftp. You may have to sudo apt-get install tftp or your equivalent.
- tftp 192.168.1.1
- tftp> mode binary
- tftp> put dd-wrt.v24_micro_generic.bin
- tftp> quit
- [For linux users: use tftp. You may have to sudo apt-get install tftp or your equivalent.
- As soon as that is finished do this: ping 192.168.1.1 /t (Windows only)
- This will time out repeatedly and then the router will respond between two and six times.
- The router will time out again a few times and then start responding to pings.
- [At this point, tiger12506 had a little trouble, but after a long reset, and some short resets, more and more lights came on until finally the WLAN light came on and the router functioned normally running DD-WRT]
- You're done, try to load 192.168.1.1.
- Check for recommended builds here.
Upgrading
Updating DD-WRT
If dd-wrt is already on the router follow these instructions. If stock firmware is on the router follow the flashing instructions.
- Check for recommended builds here first.
- Set your computer to a static IP of 192.168.1.7. (or to whatever subnet the router is on) Disable all firewalls and security. Disable wireless on your computer and only have the router connected to the flashing computer by the ethernet cable between the two.
- Hard reset or 30/30/30 (If the router supports it, if not, reset to defults in the GUI) prior to flashing. Wait. Check for password page on re-login and change password.
- Flash firmware. You can use the webgui except if you have a belkin router. (For belkin use tftp.exe to flash)
- Wait...at least three minutes. Lights should return to normal. See important2, below. Failing to wait is how most people brick their routers.
- Do a power cycle of the router. (Unplug the cord, count to 30 and plug it back in.)
- Wait for the lights to return to normal usually about 2 minutes.
- Hard reset or 30/30/30 again (If the router supports it, if not, reset to defults in the GUI). Wait. Check for the password page and re-login to change the password. Then you can reconfigure your settings manually.
- Once configured set your computer back to autoIP and autoDNS.
Important1: This Hard reset or 30/30/30 works fine for Asus router, but you do have to power cycle after the reset.
Important2: After you flash the firmware, and before you do the hard reset, the router will be building some nvram settings. YOU MUST WAIT FOR THIS TO FINISH PRIOR TO DOING ANYTHING WITH THE ROUTER INCLUDING A HARD RESET. Usually, you can tell when this process is completed by the WAN light coming on, but it does take several minutes. Go have a beer. There are starting to be more and more people who BRICK their routers by not waiting until the nvram is rebuilt, PRIOR to doing a hard reset. YOU NEED TO WAIT!
Reverting
Reverting to OEM Firmware from DD-WRT
- Reset to defaults
- goto the Admin screen firmware upgrade, and browse to VxWorksRevert-GSv7-v3.bin, and click upgrade. During this time the Web browser may say upgrade successful and to reboot -----"Do NOT REBOOT"----- Wait for 2 min's and then reboot.
- Goto
http://192.168.1.1and you should see a mgmt mode screen, this is where you browse to the original Linksys Firmware, and and upgrade. - Wait for 1 min, even if it say's upgrade successful and to reboot, believe me, in my tests, it has not finished yet.
- goto
http://192.168.1.1- you should have the regular Linksys Firmware.
JTAG-Serial Info
JTAG
JTAG Pinouts
 nTRST  1o o2  GND
   TDI  3o o4  GND
   TDO  5o o6  GND
   TMS  7o o8  GND
   TCK  9o o10 GND
 nSRST 11o o12 N/C
Using Universal JTAG Adapter
  white  1o o2 black
    red  3o o4  GND
   blue  5o o6  GND
  green  7o o8  GND
 yellow  9o o10 GND
 orange 11o o12 N/C
- /noemw /nocwd switches required
DD-WRT JTAG Recovery
JTAG:
- Backup CFE x2 (Compare the files, they must match exactly or there is something wrong with your JTAG setup)
- Erase Wholeflash x2
- Flash CFE
- Unplug Power
- Unplug JTAG Cable
TFTP:
- Set Rig ip static 192.168.1.10
- Plug network cable from rig to port 1
- Get TFTP ready, server ip - 192.168.1.1, Password - blank, file - dd-wrt.v24_micro_generic.bin
- Plug in power
- As soon as windows says "connected" hit upgrade. May have to use a network hub to make sure windows is always connected.
- Hard reset or 30/30/30
Serial
Serial Pinouts
 VCC 1 o
  TX 3 o
  RX 5 o
 N/C 7 o
 GND 9 o
Hyper terminal Setup in Windows XP
In Windows XP, Click Start Button - All Programs - Accessories -
   Communication - HyperTerminal
Enter a name for the connection, Click ok
Choose com port you adapter is plugged into, Click ok
Set:
 Bits per second = 115200
 Data Bits = 8
 Parity = none
 Stop bits = 1
 Flow control = none
Click ok
Click File - Save As, and select a place to save it to so you
             don't have to enter the settings again.
Putty Setup in Windows XP
After installing putty, run it
 Serial line = The COM port your using for serial (ie. COM3)
 Speed = 115200
Click on Serial under Connection
 Serial line to connect to = same as above (Serial line)
 Speed (baud) = 115200
 Data bits = 8
 Stop bits = 1
 Parity = none
 Flow control = none
Click Session
 Enter a name for your connection under saved sessions
Click Save
Click Open
DD-WRT Serial Recovery
Modified Redhawk0 instructions
- Connect Serial cable
- Start one of the programs from above
- Get TFTP ready with file selected
- Use dd-wrt.v24_micro_generic.bin
- Connect power to the router
- start a rapid fire Cntl-C as you plug the router to power
- type "nvram erase" w/o quotes, hit enter
- type "flash -noheader : flash1.trx" w/o quotes, this starts the tftp daemon, hit enter
- but have tftp.exe ready
- Click go or start on TFTP
- give it 5 minutes after it finishes
- then power cycle....Hard reset or 30/30/30...then config
- when it stops spitting out txt in the serial consol....hit the enter key...you should get a login prompt...at that point, power cycle it, Hard reset or 30/30/30...then config
- you'll see it boot up
USB Info
No USB
vlan Info
DD-WRT vlan Info
- Confirmed the WRT54GS v7.0 supports port-based vlans via the GUI.
- Confirmed the WRT54GS v7.0 supports port-based vlans via nvram with micro-plus-SSH.
WRT54GS v7.0's ports are mapped like this:
 1 2 3 4 | case labels
 3 2 1 0 | nvram port numbers
Defaults
root@DD-WRT:~# nvram show | grep vlan.ports
vlan1ports=4 5
vlan0ports=3 2 1 0 5*
size: 17222 bytes (15546 left)
root@DD-WRT:~# nvram show | grep port.vlans
port5vlans=0 1 16
port4vlans=0
port3vlans=0
port2vlans=0
port1vlans=0
port0vlans=1
size: 17222 bytes (15546 left)
root@DD-WRT:~# nvram show | grep vlan.hwname
vlan1hwname=et0
vlan0hwname=et0
size: 17222 bytes (15546 left)
root@DD-WRT:~# lsmod
Module                  Size  Used by
ip_nat_pptp             2192   0 (unused)
ip_conntrack_pptp       2524   1
ip_nat_proto_gre        1552   0 (unused)
ip_conntrack_proto_gre    2312   0 [ip_nat_pptp ip_conntrack_pptp]
switch-robo             5036   0 (unused)
switch-core             5984   0 [switch-robo]
root@DD-WRT:~# ls /proc/switch
eth0
root@DD-WRT:~# cat /proc/switch/eth0/vlan/0/ports
0       1       2       3       5t*
root@DD-WRT:~# cat /proc/switch/eth0/vlan/1/ports
4       5t
root@DD-WRT:~# cat /proc/switch/eth0/vlan/2/ports
I
root@DD-WRT:~#
Commands
root@DD-WRT:~# nvram set vlan1ports="3 4 5"
root@DD-WRT:~# nvram set vlan0ports="2 1 0 5*"
root@DD-WRT:~# nvram commit
root@DD-WRT:~# reboot
nvram
root@DD-WRT:~# nvram show | grep vlan.ports
vlan1ports=3 4 5
vlan0ports=2 1 0 5*
size: 17342 bytes (15426 left)
root@DD-WRT:~# nvram show | grep port.vlans
port5vlans=0 1 16
port4vlans=0
port3vlans=0
port2vlans=0
port1vlans=0
port0vlans=1
size: 17342 bytes (15426 left)
root@DD-WRT:~# nvram show | grep vlan.hwname
vlan1hwname=et0
vlan0hwname=et0
size: 17342 bytes (15426 left)
root@DD-WRT:~#
GUI
root@DD-WRT:~# nvram show | grep vlan.ports
vlan1ports=4 5
vlan0ports=3 2 1 0 5*
size: 17386 bytes (15382 left)
root@DD-WRT:~# nvram show | grep port.vlans
port5vlans=0 1 16
port4vlans=1 18 19
port3vlans=0 18 19
port2vlans=0 18 19
port1vlans=0 18 19
port0vlans=1 18 19
size: 17386 bytes (15382 left)
root@DD-WRT:~# nvram show | grep vlan.hwname
vlan1hwname=et0
vlan0hwname=et0
size: 17386 bytes (15382 left)
root@DD-WRT:~#
Pictures
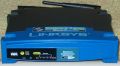
Front/Top
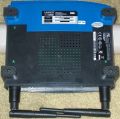
Bottom
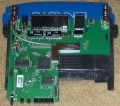
Board Top
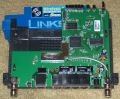
Board Top2
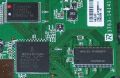
Chips


Notes
DD-WRT Notes
[DD-WRT v24 RC3] The WRT54GS v7.0 is now fully supported (if its not an intel chip - see important note below),
- but requires again a special flashing way, which is easier this time compared to the v5 and v6 vxworks killer.
All Chips are supported, just follow step by step procedure at:
WARNING: There are at least two types of flash chips that are used on the v7 router.
- Using this method with an INTEL-type flash chip will brick your router.
There is not currently a solution for using vxworkskiller with the intel-chip v7 routers.
See also the relevant forum post
I just had found this link --> http://blog.rim3y.net/zero/?p=942
This procedure worked easy and great, the 1st bin file I installed with the admin. options in the Linksys control panel (the upload went about half way then tried to reboot (then bricked my WRT54GS v7), following the procedure from the above mentioned site using this command "tftp -i 192.168.1.1 put dd-wrt.v24_micro_generic.bin" from the location of the bin file, worked fine had to HIT enter 2 times to execute the command to install the 2nd bin file, now my WRT54GS v7 has so many features I need to find a good post for some tweak settings.
