Netgear WNDR3400v1
Netgear WNDR3400 v1
Availability: common
Manuf (OEM/ODM): Foxconn U12H155 T00
FCC approval date: 01 April 2010
(Est.) release date: 01 September 2010
UPC: 606449071146 (UPC DB, On eBay)
Country of manuf.: China
S/N prefix: 2BK,2BL,2HT,2PF,2R7,2R8,2R9,2RB,2F0
Series: N600
Amazon image
ASIN
B0041LYY6K (![]() , On Amazon, On CCC, multiple uses)
, On Amazon, On CCC, multiple uses)
multiple revisions of this device, use caution
Type: wireless router
FCC ID: PY309300116
IC ID: 4054A-09300116
PCB ID: U12H155T00
Power: 12 VDC, 1.5 A
Connector type: barrel
CPU1: Broadcom BCM4718A1
FLA1: 8 MiB8,388,608 B <br />65,536 Kib <br />8,192 KiB <br />64 Mib <br />0.00781 GiB <br /> (Macronix MX25L6405DMI-12G)
RAM1: 64 MiB67,108,864 B <br />524,288 Kib <br />65,536 KiB <br />512 Mib <br />0.0625 GiB <br /> (Samsung K4T51163QG-HCE6)
Expansion IFs: USB 2.0
USB ports: 1
WI1 chip1: Broadcom BCM4718A1
WI1 802dot11 protocols: bgn
WI1 MIMO config: 2x2:2
WI1 antenna connector: none
WI2 chip1: Broadcom BCM43224
WI2 802dot11 protocols: an
WI2 MIMO config: 2x2:2
WI2 antenna connector: none
ETH chip1: Broadcom BCM4718A1
Switch: Broadcom BCM5325E
LAN speed: 100M
LAN ports: 4
WAN speed: 100M
WAN ports: 1
abgn
Stock FW OS: Linux 2.6.22
TPFirmware supported: DD-WRT • (List), FreshTomato • (List | DLs)
Flags: DFS
Default SSID: NETGEAR (44 addl. devices)
, NETGEAR-5G
Default IP address: 192.168.1.1
the IP 192.168.1.1 is used by 1295 additional devices
of which 105 are Netgear devices
Default login user: admin
Default login password: password
admin:password credentials used by 421 additional devices
of which 302 are Netgear devices
802dot11 OUI: 20:4E:7F (16 E, 16 W), 30:46:9A (11 E, 14 W), E0:46:9A (15 E, 16 W), E0:91:F5 (11 E, 12 W)
Ethernet OUI: 20:4E:7F (16 E, 16 W), 30:46:9A (11 E, 14 W), E0:46:9A (15 E, 16 W), E0:91:F5 (11 E, 12 W)
| FCC ID | |
|---|---|
| Netgear WNDR3300v2 | PY309300116 |
| CPU1 brand | WI1 chip1 brand | WI2 chip1 brand | |
|---|---|---|---|
| Netgear WNDR3400v1 | Broadcom | Broadcom | Broadcom |
| Netgear WNDR3400v2 | Broadcom | Broadcom | Broadcom |
| Netgear WNDR3400v3 | Broadcom | Broadcom | Broadcom |
For a list of all currently documented Broadcom chipsets with specifications, see Broadcom.
N600 Wireless Dual Band Router
- Simultaneous Dual-Band, 10/100 Mbps Ethernet (FE)
The default SSIDs for the device are assumed to be NETGEAR and NETGEAR-5G.
The device is in the DD-WRT Supported Device table, and has its own wiki.
- On the DD-WRT forums (test build on pg7)
Links of Interest
- WNDR3400 WiFi 5GHz LED doesn't flash with activity
- Netgear WNDR3300v2 and WNDR3400
- GURU's Netgear WNDR3400 update
- Netgear WNDR3400 support
Flashing
Flashing OpenWrt
| WARNING: This is highly beta OpenWRT version. This image may brick your router. Make sure you have serial cable to debrick router!! |
- So far tests indicate no WebUI, No Wireless, it has telnet access.
Currently, there is a development version of OpenWRT for this router located
Also, this is not beginner firmware. If you've never dealt with a console, avoid!
To flash:
- Do a 30/30/30 reset.
- With the stock firmware, flash that build.
- Do a 30/30/30 reset again.
By default, OpenWRT does not include a web interface and as such,
- must be installed using opkg or must be compiled with it included.
Telnet is available. Once the password is changed, telnet becomes
- unavailable and ssh becomes available.
Support for this model is still in development so not everything works.
- The build linked above is using kernel version 3.6 as of this writing.
I've been told that 3.8 works much better for it. Unconfirmed however.
Wireless is disabled by default. To enable, type in the console:
uci set wireless.@wifi-device[0].disabled=0
Flashing Tomato
| WARNING: This is highly beta Tomato version. This image may brick your router. Make sure you have serial cable to debrick router!! |

- Beta
- Note: Intial flash must be done from the OEM firmware.
- If your running dd-wrt, revert to the OEM firmware first.
- restore default settings
- flash using tomato image via GUI
- after flash leave router for 5–7 minutes until ping 192.168.1.1 will return
- log into Tomato and first of all erase nvram!!
- after erase 2nd radio will disapear. Dont panic :) Just make reboot one more time
- log into tomato and Have fun
TomatoUSB Support Details:
- - both radios works
- - usb works
- - power led and usb led works correct
- - wps and reset buttons works
- - VLANs are not supported yet
- - wireless leds may not work correct
- - upgrade router via GUI will brick router!!
Image: tomato-Netgear-3400v1-K26USB-1.28.RT-101.chk
Flashing DD-WRT
| WARNING: Initial flash must be with a tailed build, after which any build with -nv64k can be used. |
Step 1: Backup your current router configuration
- Login to your router… probably at http://192.168.1.1
- Find the maintenance group in the left menu and click on ‘Backup Settings‘
- Click the button labeled ‘Back Up’ You’ll be prompted to download a file, save it and stick it on your desktop or someplace safe in case you need it later.
Step 2: Download factory firmware (just in case!!)
As a precaution, I chose to download the factory firmware ahead of time so I could have it on hand if this entire process fails and I need to revert everything.
- Download: Recovery Instructions from Netgear
- Download: WNDR3400v1 Firmware
Note: These recovery instructions have not been tested by me, use at your own risk.
Step 3: Download the DD-WRT firmware
Downloading via the normal DD-WRT process didn’t work out because it stated the router wasn’t compatible and therefore wouldn’t provide a link.
There is now a WNDR3400 chk file included in the official SVN stream, you can browse the 12/08/2011 release files here.
Step 4: Flash DD-WRT on to the router
Before flashing the firmware on your router, it’s highly highly suggested to do a 30-30-30 reset. You can find instructions for this here: http://www.dd-wrt.com/phpBB2/viewtopic.php?t=51486
Quoting from the “peacock” thread in the DD-WRT forums:
- “Failing to do a hard reset and failing to wait after flashing are the two most common NOOB errors that lead them to a world of unnecessary dd-wrt pain! This is not a minor optional step. The firmware writes information to the Nvram. This step clears that information. If you don’t clear it properly, parts of the old information be present with the new firmware, which can make it not operate properly. Don’t cut corners. Doing it before you upgrade can be very important; a hard reset is not just for after upgrades.”
After performing the 30-30-30 reset, log back in to the router and flash it via the web gui.
- Do NOT use a wireless connection to upload firmware. Use a wired (LAN) connection.
- Login to your router… probably at http://192.168.1.1
- Find the maintenance group in the left menu and click on “Router Upgrade”
- Click the browse button and find dd-wrt.v24-17990_NEWD-2_K2.6_mini-WNDR3400.chk

- Click the “Upload” button and wait for the process to complete.
- After the process is done and the router reboots, you can connect to http://192.168.1.1 and should see DD-WRT loaded successfully.
- Perform another 30-30-30 reset.
- After the reset procedue is done, login to the router and set a username & password.
Step 5: Upgrade to latest version of DD-WRT:
Now we have DD-WRT running on our WNDR3400v1, we can upgrade to the latest release using the normal flash method via the web gui.
With the latest release, I attmpted to load the “mega” file and it was a success…
The upgrade process is pretty simple at this point. Some suggest doing a hard reset before and after upgrading. Since I just did a hard reset after installing DD-WRT, it’s not really needed again unless you make some configuration changes before you upgrade.
- Do a 30-30-30 reset if you need to.
- Do NOT use a wireless connection to upload firmware. Use a wired (LAN) connection.
- Login to your router… probably at http://192.168.1.1
- Click on the Administration tab and then click on Firmware Upgrade:

- Choose the option to Reset to Defaults after flashing.
- Click browse and find dd-wrt.v24-17990_NEWD-2_K2.6_mega-nv64k.bin
- Click the “Upgrade” button at the bottom of the page and wait….
- The router will take a few minutes to upload the file and flash the firmware. During this time, the power light will flash.
- A new page will open confirming that the upload was successful.
- It’s advised to wait at least 5 minutes before clicking continue.
- Do a 30-30-30 reset.
- After the reset procedue is done, login to the router and set a username & password.
You should now see something like the screen below that shows the 17990 firmware loaded on your WNDR3400v1:

I’ve been running this on my router for a couple of days and all the features I need are active and working. Your mileage may vary….
Upgrading
Upgrade OpenWrt
Upgrade Tomato
Upgrade DD-WRT
Updating DD-WRT
If dd-wrt is already on the router follow these instructions. If stock firmware is on the router follow the flashing instructions.
- Check for recommended builds here first.
- Set your computer to a static IP of 192.168.1.7. (or to whatever subnet the router is on) Disable all firewalls and security. Disable wireless on your computer and only have the router connected to the flashing computer by the ethernet cable between the two.
- Hard reset or 30/30/30 (If the router supports it, if not, reset to defults in the GUI) prior to flashing. Wait. Check for password page on re-login and change password.
- Flash firmware. You can use the webgui except if you have a belkin router. (For belkin use tftp.exe to flash)
- Wait...at least three minutes. Lights should return to normal. See important2, below. Failing to wait is how most people brick their routers.
- Do a power cycle of the router. (Unplug the cord, count to 30 and plug it back in.)
- Wait for the lights to return to normal usually about 2 minutes.
- Hard reset or 30/30/30 again (If the router supports it, if not, reset to defults in the GUI). Wait. Check for the password page and re-login to change the password. Then you can reconfigure your settings manually.
- Once configured set your computer back to autoIP and autoDNS.
Important1: This Hard reset or 30/30/30 works fine for Asus router, but you do have to power cycle after the reset.
Important2: After you flash the firmware, and before you do the hard reset, the router will be building some nvram settings. YOU MUST WAIT FOR THIS TO FINISH PRIOR TO DOING ANYTHING WITH THE ROUTER INCLUDING A HARD RESET. Usually, you can tell when this process is completed by the WAN light coming on, but it does take several minutes. Go have a beer. There are starting to be more and more people who BRICK their routers by not waiting until the nvram is rebuilt, PRIOR to doing a hard reset. YOU NEED TO WAIT!
Reverting
Reverting to OEM Firmware from OpenWrt
Reverting to OEM Firmware from TomatoUSB
- flash ofw image via GUI
- after flash router wuill brick and power led will blink green light
- flash ofw image one more time using tftp client
- after flash make 30-30-30 reset
Original image: WNDR3400-V1.0.0.50_20.0.59-OFW.chk
Reverting to OEM Firmware from DD-WRT
- Per Eko
There is simple way to flash original firmware.
- -with router running dd-wrt, telnet in, do "mtd erase linux", wait until finished (2-3 min), then type "reboot"
- -now router waits for new firmware - tftp the original .chk file (with your PC set to static IP 192.168.1.10 etc)
- -when tftp transfer finishes, wait 3-4 min...
JTAG-Serial Info
JTAG
JTAG Pinouts
J14 - DO NOT HOOK UPTO J10
 nTRST  1o o2  GND
   TDI  3o o4  GND
   TDO  5o o6  GND
   TMS  7o o8  GND
   TCK  9o o10 GND
 nSRST 11o o12 N/C
Using Universal JTAG Adapter
  white  1o o2  black
    red  3o o4  GND
   blue  5o o6  GND
  green  7o o8  GND
 yellow  9o o10 GND
 orange 11o o12 N/C
JTAG Recovery
Serial
Serial Pinouts
JP1 = 3.3v TTL Serial, 115200/8/N , 1 row of six pins
 GND 6 o
 RX  5 o
 N/C 4 o
 N/C 3 o
 TX  2 o
 VCC 1 o
this setup was tested on the 3/20/2013, some other websites are showing the RX and TX opposite and this why does not work for this type of router
Hyper terminal Setup in Windows XP
In Windows XP, Click Start Button - All Programs - Accessories -
   Communication - HyperTerminal
Enter a name for the connection, Click ok
Choose com port you adapter is plugged into, Click ok
Set:
 Bits per second = 115200
 Data Bits = 8
 Parity = none
 Stop bits = 1
 Flow control = none
Click ok
Click File - Save As, and select a place to save it to so you
             don't have to enter the settings again.
Putty Setup in Windows XP
After installing putty, run it
 Serial line = The COM port your using for serial (ie. COM3)
 Speed = 115200
Click on Serial under Connection
 Serial line to connect to = same as above (Serial line)
 Speed (baud) = 115200
 Data bits = 8
 Stop bits = 1
 Parity = none
 Flow control = none
Click Session
 Enter a name for your connection under saved sessions
Click Save
Click Open
Serial Recovery
- As of March 2013
- After Setting up the Putty session, power up your router with the USB serial TTL cable you should see some info scrolling on the screen, press control-c rapidly and it will come with a promt CFE>
- type on this prompt tftpd to start the tftpd server, you should see the message saying the command START TFTP SERVER and the message READING::: ts ready to send the new firmware.
- assuming you have download the latest Firmware from Netgear do the following, open a cmd terminal and go to the folder you have save the firmware, type the following : tftp -i 192.168.1.1 put FIRMWARE_FILE.chk, you should see some comments about this on the putty session like reading processing and programing.
- the router will start itself give it some time until finish
it took me a while to sort out this router but i finally did it doing it this way.
USB Info
DD-WRT USB
- The USB port is where you can connect an external USB hard drive or flash drive.
- Which can do a multitude of things. You can use in as a NAS, storage for a FTP
- server, use Optware to run external programs like torrent software, samba for
- sharing files to network, share a USB printer with network...
- The list of possibilities is long, it just takes a little research.
- ProFTPd is included in most the newer builds of dd-wrt.
- Check the features chart to be sure.
Tomato
TomatoUSB comes with file sharing, ftp server and media server built in.
Tutorial: How to set up NAS and Optware on Tomato FOR TOTAL NOOBS
Vlan Info
DD-WRT Vlan Info
- WikiDevi:DD-WRT/VLAN Support Testing Needed
Pictures
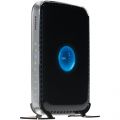
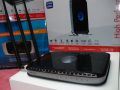
Angle Stand
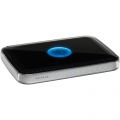
Angle Flat
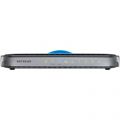
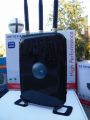
Front


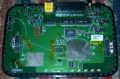
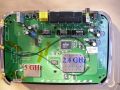
Board Top
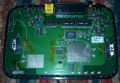
Board Top2
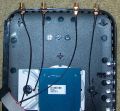
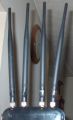
Antenna mod


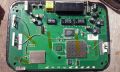
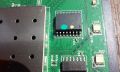
Top of the PCB
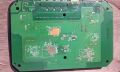
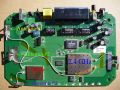
Bottom of the PCB
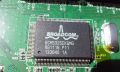
Controller
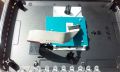
GPIO Cable
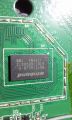
RAM
Flash+unknown IC


Notes
Known GPIO pin support:
| GPIO # | Function/text |
|---|---|
| 0 | LED blue 5 GHz |
| 1 | LED green internet-link |
| 2 | USB on/off |
| 3 | LED green power |
| 4 | button |
| 5 | robo reset |
| 6 | wps button on top (act low) |
| 7 | LED amber power |
| 8 | wlan button on/off (act low) |
| 9 | LED green 2.4 GHz on/off |
| 10 | LED blue wps (set 1 of 4) |
| 11 | LED blue wps (set 2 of 4) |
| 12 | unknown |
| 13 | LED blue wps (set 3 of 4) |
| 14 | LED blue wps (set 4 of 4) |
| 15 | unknown |
Boot Log
| • Boot log |
|---|
Decompressing..........done

CFE for WNDR3400 version: v1.0.8
Build Date: Thu Apr 22 16:51:23 CST 2010
Init Arena
Init Devs.
Boot partition size = 262144 (0x40000)
Found a 8MB ST compatible serial flash
et0: Broadcom BCM47XX 10/100/1000 Mbps Ethernet Controller 5.10.56.28
CPU type 0x19740: 453MHz
Tot mem: 65536 KBytes
Device eth0: hwaddr E0-46-9A-7F-85-D7, ipaddr 192.168.1.1, mask 255.255.255.0
gateway not set, nameserver not set
Loader:raw Filesys:tftp Dev:eth0 File:192.168.1.2:vmlinuz Options: (null)
Loading: Failed.
Could not load 192.168.1.2:vmlinuz: Timeout occured
Linux version 2.6.22.19 (root@tomato) (gcc version 4.2.4) #7 Thu Sep 13 18:53:59 CEST 2012
CPU revision is: 00019740
Found a 8MB ST compatible serial flash
Determined physical RAM map:
memory: 04000000 @ 00000000 (usable)
Built 1 zonelists. Total pages: 16256
Kernel command line: root=/dev/mtdblock2 noinitrd console=ttyS0,115200
Primary instruction cache 32kB, physically tagged, 4-way, linesize 32 bytes.
Primary data cache 32kB, 4-way, linesize 32 bytes.
Synthesized TLB refill handler (20 instructions).
Synthesized TLB load handler fastpath (32 instructions).
Synthesized TLB store handler fastpath (32 instructions).
Synthesized TLB modify handler fastpath (31 instructions).
PID hash table entries: 256 (order: 8, 1024 bytes)
CPU: BCM4716 rev 1 pkg 10 at 453 {{abbr|MHz|megahertz}}
Using 226.500 {{abbr|MHz|megahertz}} high precision timer.
console [ttyS0] enabled
Dentry cache hash table entries: 8192 (order: 3, 32768 bytes)
Inode-cache hash table entries: 4096 (order: 2, 16384 bytes)
Memory: 61828k/65536k available (33k kernel code, 3644k reserved, 2726k data, 116k init, 0k highmem)
Mount-cache hash table entries: 512
NET: Registered protocol family 16
PCI: Using membase 8000000
PCI: Initializing host
PCI: Reset RC
PCI: Fixing up bus 0
PCI: Fixing up bridge
PCI: Fixing up bridge
PCI: Enabling device 0000:01:00.1 (0004 -> 0006)
PCI: Fixing up bus 1
NET: Registered protocol family 2
Time: MIPS clocksource has been installed.
IP route cache hash table entries: 1024 (order: 0, 4096 bytes)
TCP established hash table entries: 2048 (order: 2, 16384 bytes)
TCP bind hash table entries: 2048 (order: 1, 8192 bytes)
TCP: Hash tables configured (established 2048 bind 2048)
TCP reno registered
squashfs: version 3.0 (2006/03/15) Phillip Lougher
io scheduler noop registered (default)
HDLC line discipline: version $Revision: 4.8 $, maxframe=4096
N_HDLC line discipline registered.
Serial: 8250/16550 driver $Revision: 1.90 $ 2 ports, IRQ sharing disabled
serial8250: ttyS0 at MMIO 0xb8000300 (irq = 8) is a 16550A
PPP generic driver version 2.4.2
MPPE/MPPC encryption/compression module registered
NET: Registered protocol family 24
PPPoL2TP kernel driver, V0.18.3
PPTP driver version 0.8.5
pflash: found no supported devices
Creating 6 MTD partitions on "sflash":
0x00000000-0x00040000 : "pmon"
0x00040000-0x00790000 : "linux"
0x00151238-0x00640000 : "rootfs"
0x00640000-0x00780000 : "jffs2"
0x007f0000-0x00800000 : "nvram"
0x007e0000-0x007f0000 : "board_data"
u32 classifier
OLD policer on
Netfilter messages via NETLINK v0.30.
nf_conntrack version 0.5.0 (512 buckets, 4096 max)
ip_tables: (C) 2000-2006 Netfilter Core Team
ipt_account 0.1.21 : Piotr Gasidlo <quaker@barbara.eu.org>, http://www.barbara.eu.org/~quaker/ipt_account/
net/ipv4/netfilter/tomato_ct.c [Sep 13 2012 16:17:11]
NET: Registered protocol family 1
NET: Registered protocol family 10
ip6_tables: (C) 2000-2006 Netfilter Core Team
NET: Registered protocol family 17
802.1Q VLAN Support v1.8 Ben Greear <greearb@candelatech.com>
All bugs added by David S. Miller <davem@redhat.com>
VFS: Mounted root (squashfs filesystem) readonly.
Freeing unused kernel memory: 116k freed
Warning: unable to open an initial console.
emf: module license 'Proprietary' taints kernel.
eth0: Broadcom BCM47XX 10/100/1000 Mbps Ethernet Controller 5.10.147.0
eth1: Broadcom BCM4329 802.11 Wireless Controller 5.10.147.0
PCI: Enabling device 0000:01:01.0 (0000 -> 0002)
Netgear WNDR3400
eth2: Broadcom BCMa8d8 802.11 Wireless Controller 5.10.147.0
/ # lo: File exists
|
DD-WRT Notes
The WNDR3400 CVNA (Cablevision edition) default username and password is admin/optimum
Hardware Modification
WNDR3400v2 model will feature the BCM5358 chipset.
Antenna Mod
- Antenna MOD Images