WikiDevi.Wi-Cat.RU:DD-WRT/How to - Format and Partition External Storage Device
Formatting and Partitioning USB Storage for DD-WRT
NOTE This Wiki applies only to USB capable devices. Also, if using any flash-based media (SD, Thumb drives, SSD etc., the EXT2 filesystem format is advised due to the fact that EXT3 uses Journaling. EXT2 performs fewer writes than EXT3 since it does not need to write to the journal. As the major aging factor of a flash chip is the number of erase cycles, and as those happen frequently on writes, this increases the life span of the solid-state device. Using EXT2 on self powered HDD's is also advisable as it will increase the Read/Write speeds. However, it is important to note that using EXT2, without a U.P.S, or other consistent PSU, can cause the file-structure to become corrupted if power is lost or the drive is unmounted improperly!
- Introduction:
Due to the very nature of DD-WRT, its infrastructure, and the routers they support, one must use a Linux file format in order to take full advantage of the thousands of installable packages that allow for incredible user control and add excellent flexibility to the router.
Optware is a highly useful system, especially for those with routers capable of USB external storage support.
This page will illustrate, in the highest detail possible, how to correctly and painlessly perform the steps required to Format and Partition your External storage device for use with Optware and other means.
If you own a USB capable router, there should be no excuse not to follow this guide as it will open up more doors than you can imagine!
Metaphorical example: You buy a Chevy Silverado 3500HD dually with a Turbo diesel engine. However you don't install the towing package. Well, why the hell did you buy it in the first place? Hook up that towing package and get what you paid for!
Windows Method Using Linux Live CD and Gparted
If you are already a Linux OS user, great, as it will be slightly less of a procedure. See the preferred Linux method below For Windows users, there are several things you need to prepare before attempting this:
1. Download GParted, which is a free, user friendly and disk bootable Linux distribution OS tool. You MUST have this to perform the following as Windows does not have the capability of formatting Linux filesystems.
2. Once downloaded you will need to burn the image to a CD-R using a program like Nero.
3. Once the operation is complete, re-insert the disk and reboot Windows. Once your computer reboots, the bootdisk will initialize and GParted will start up. If it doesn't, you need to make sure your PC's BIOS settings dictate that the boot sequence starts with your CD-ROM drive as the first device.
4. Once GParted loads, select your language. Sit back and wait for it to load.
5. Once in GParted, connect the drive you wish to Format and Partition.
6. Right-Click the drive icon and select "Unmount."
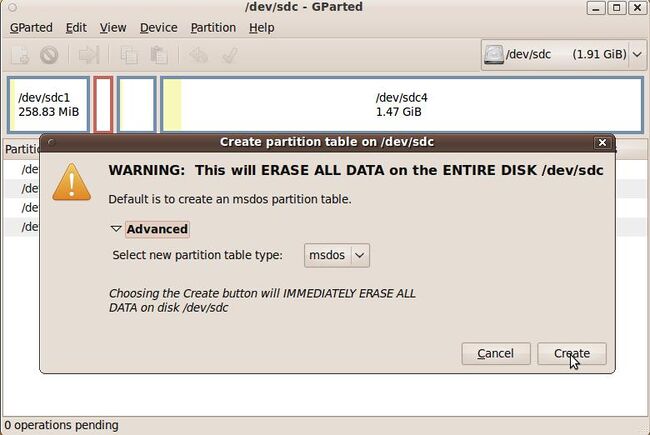
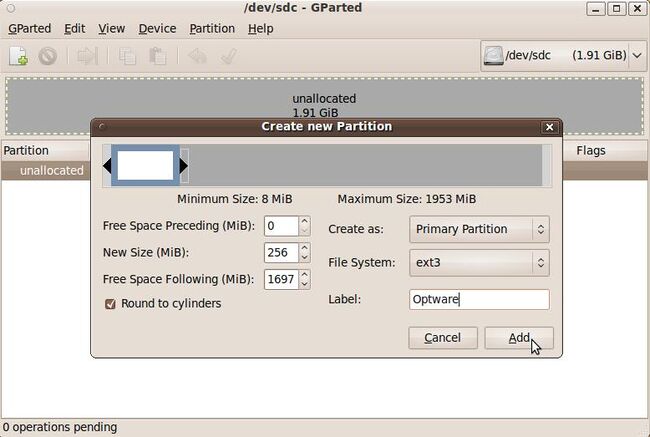
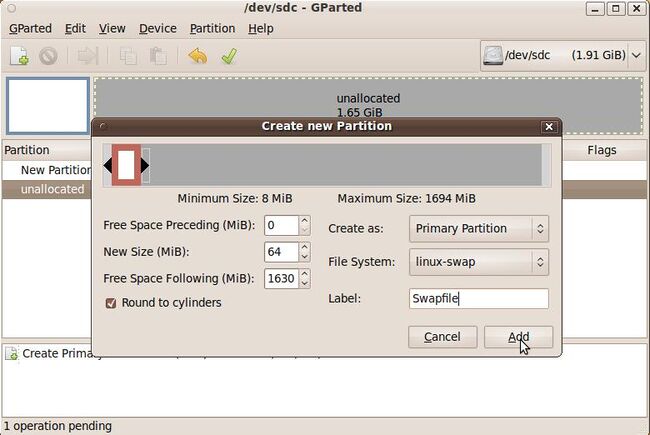
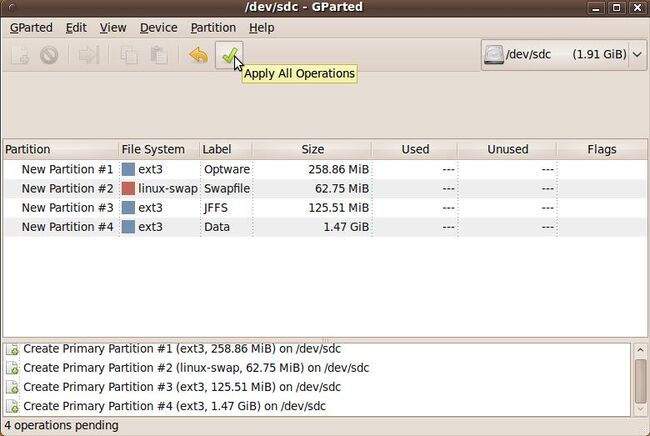
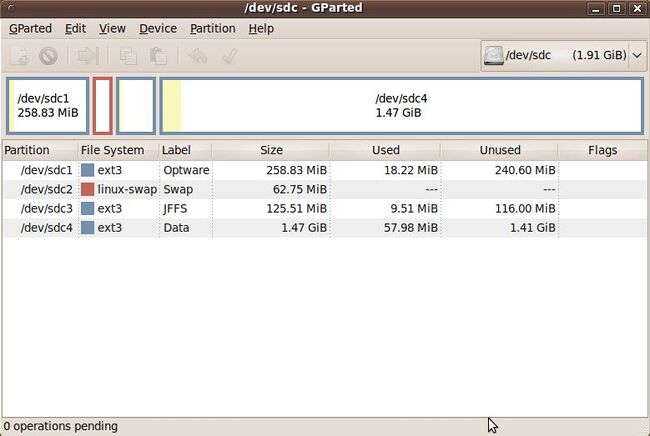
7. Now you will need to prepare the drive and format/partition it. The following images illustrate the procedure (UPDATE the Minimum size for Optware should be 512MB) Also the JFFS partition is NOT needed for USB users, only MMC users. If you add the JFFS partition to your USB device and post in the forums regarding an issue, you will not be answered!!!!:
8a. Click Device and select Create Partition Table
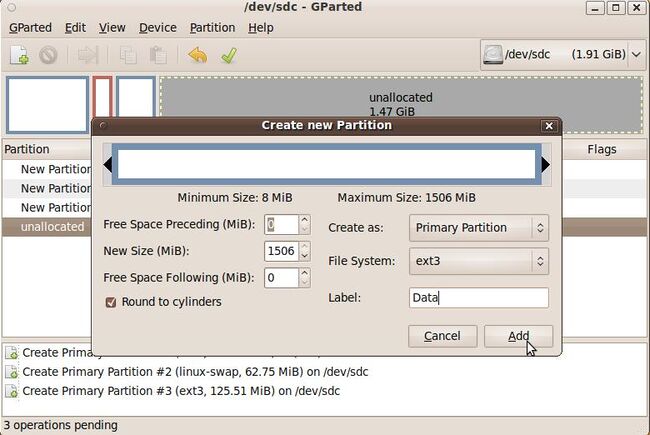
8b. Right click the "Unallocated Space and select New. Continue this procedure for each Partition you create
The partition size value for the following Data partition should be left alone, as this is the remaining space on the disk:
You're finished! Now all that's left to do is plug the drive into your router and enable the modules you need.
Linux Command Line Method (preferred)
1. After Ubuntu boots, plug in the drive you wish to format. Once it is recognized and the Icon is displayed on the Desktop, Righ-click and select Unmount
2. Navigate to the browsing menu at the top of the screen and look for Applications->Accessories, then click Terminal
Once in the Terminal window, read the following directions and enter the following commands:
NOTE: All BOLD text in this Wiki will be the commands that you enter.
3. Type sudo su - as this allows you to become root, or full administrator of the machine.
Using the fdisk command, you will be creating four partitions:
- sd?1 - the /opt partition, where Optware will reside.
- sd?2 - the swap partition, where Linux will swap jobs.
- sd?3 - the /jffs partition - For additional JFFS space, or whatever.. For MMC users only!
- sd?4 - the data partition, which you will share via Samba or FTP.
NOTE The ?'s are the drive letters Linux assigns. You will need to determine which one is correct by issuing the command fdisk -l. You will be looking for the disk you want to format (It will almost be towards the end of the print-out). Here is an example of what it should look like:
root@ubuntu:~# fdisk -l (lower case L)
Disk /dev/sda: 100.0 GB, 100030242816 bytes
255 heads, 63 sectors/track, 12161 cylinders
Units = cylinders of 16065 * 512 = 8225280 bytes
Disk identifier: 0x89e489e4
  Device Boot      Start         End      Blocks   Id  System
/dev/sda1   *           1       12160    97675168+   7  HPFS/NTFS
Disk /dev/sdb: 1000.2 GB, 1000204886016 bytes
255 heads, 63 sectors/track, 121601 cylinders
Units = cylinders of 16065 * 512 = 8225280 bytes
Disk identifier: 0x0c347bdb
  Device Boot      Start         End      Blocks   Id  System
/dev/sdb1               1      121601   976760001    7  HPFS/NTFS
Disk /dev/sdc: 2055 MB, 2055019520 bytes
215 heads, 43 sectors/track, 434 cylinders
Units = cylinders of 9245 * 512 = 4733440 bytes
Disk identifier: 0x000e0383
  Device Boot      Start         End      Blocks   Id  System
/dev/sdc1   *           1         435     2006854+ begin_of_the_skype_highlighting              1 435 2006854+      end_of_the_skype_highlighting   c  W95 FAT32 (LBA)
Partition 1 has different physical/logical endings:
    phys=(249, 214, 43) logical=(434, 32, 4)
Disk /dev/sdd: 8015 MB, 8015314944 bytes
255 heads, 63 sectors/track, 974 cylinders
Units = cylinders of 16065 * 512 = 8225280 bytes
Disk identifier: 0x0006fe25
  Device Boot      Start         End      Blocks   Id  System
/dev/sdd1               1         974     7823623+   b  W95 FAT32
fdisk /dev/sdd
Command (m for help): p
Disk /dev/sdd: 8015 MB, 8015314944 bytes
255 heads, 63 sectors/track, 974 cylinders
Units = cylinders of 16065 * 512 = 8225280 bytes
Disk identifier: 0x0006fe25
  Device Boot      Start         End      Blocks   Id  System
/dev/sdd1               1         974     7823623+   b  W95 FAT32
fdisk /dev/sdd happens to be the drive I wish to format.
It's important to understand everyone's disk drive configuration will be different. If your drive is 40 GB or smaller, use the smaller set of partition sizes below. If your drive is over 40 GB, you can use the larger set of partition sizes.
Disk 40 GB or less
- /opt 512 megabytes
- swap 32 megabytes
- /jffs 128 megabytes
- data remainder of the disk
Disk greater than 40 GB
- /opt 512 megabytes
- swap 64 megabytes
- /jffs 256 megabytes
- data remainder of the disk
JFFS partition is NOT needed for USB users, only MMC users.
NOTE For smaller storage devices such as SD/MMC and flash drives, the minimum partition size for /opt should be 384MB
Also the /jffs partition is not necessary if you are only installing this Optware and are a USB user.
Code: (the ? are the drive letters (c,d,e etc.) so make sure you choose the correct one!) The bold texts are the commands
fdisk /dev/sd?
Command (m for help): d (deletes the partition)
Selected partition 1
Command (m for help): p
Disk /dev/sdd: 8015 MB, 8015314944 bytes
255 heads, 63 sectors/track, 974 cylinders
Units = cylinders of 16065 * 512 = 8225280 bytes
Disk identifier: 0x0006fe25
Device Boot      Start         End      Blocks   Id  System
Command (m for help): p
Disk /dev/sd?: 64 heads, 63 sectors, 621 cylinders
Units = cylinders of 4032 * 512 bytes
Command (m for help): n
Command action
  e   extended
  p   primary partition (1-4)
p
Partition number (1-4): 1
First cylinder (1-621, default 1):<HIT ENTER>
Using default value 1
Last cylinder or +size or +sizeM or +sizeK (1-621, default 621): +512M <HIT ENTER>
Command (m for help): n
Command action
  e   extended
  p   primary partition (1-4)
p
Partition number (1-4): 2
First cylinder (197-621, default 197):<HIT ENTER>
Using default value 197
Last cylinder or +size or +sizeM or +sizeK (197-621, default 621): +64M <HIT ENTER>
Command (m for help): n
Command action
  e   extended
  p   primary partition (1-4)
p
Partition number (1-4): 3
First cylinder (197-621, default 197):<HIT ENTER>
Using default value 621
Last cylinder or +size or +sizeM or +sizeK (197-621, default 621): +128M <HIT ENTER>
Command (m for help): n
Command action
  e   extended
  p   primary partition (1-4)
p
Partition number (1-4): 4
First cylinder (197-621, default 197):<HIT ENTER>
Using default value 1
Last cylinder or +size or +sizeM or +sizeK (197-621, default 621): <HIT ENTER>
Command (m for help): t
Partition number (1-4): 2
Hex code (type L to list codes): 82
Changed system type of partition 2 to 82 (Linux swap)
Command (m for help): p
Disk /dev/sd?: 64 heads, 63 sectors, 621 cylinders
Units = cylinders of 4032 * 512 bytes
Device Boot    Start       End    Blocks   Id  System
/dev/sd?1   *         1       196    395104+  83  Linux
/dev/sd?2           197       262    133056   82  Linux swap
/dev/sd?3           263       458    395136   83  Linux
Command (m for help): w
Formatting the /opt, /jffs and Data Partitions, and preparing the Swap Partition
NOTE
If an error occurs for the following such as:
root@ubuntu:~# mke2fs -m 1 -L Optware /dev/sdd1
mke2fs 1.41.4 (27-Jan-2009)
/dev/sdd1 is mounted; will not make a filesystem here!
Then you have not unmounted the drive.
Terminal Commands:
mke2fs -m 1 -L Optware /dev/sd?1
mke2fs 1.18, 11-Nov-1999 for EXT2 FS 0.5b, 95/08/09
Filesystem label=Optware
OS type: Linux
Block size=4096 (log=2)
Fragment size=4096 (log=2)
122112 inodes, 243964 blocks
12198 blocks (5.00%) reserved for the super user
First data block=0
8 block groups
32768 blocks per group, 32768 fragments per group
15264 inodes per group
Superblock backups stored on blocks:
32768, 98304, 163840, 229376
Writing inode tables: done
Writing superblocks and filesystem accounting information: done
mke2fs -m 1 -L Shared /dev/sd?3
mke2fs 1.18, 11-Nov-1999 for EXT2 FS 0.5b, 95/08/09
Filesystem label=Shared
OS type: Linux
Block size=4096 (log=2)
Fragment size=4096 (log=2)
122112 inodes, 243964 blocks
12198 blocks (5.00%) reserved for the super user
First data block=0
8 block groups
32768 blocks per group, 32768 fragments per group
15264 inodes per group
Superblock backups stored on blocks:
32768, 98304, 163840, 229376
Writing inode tables: done
Writing superblocks and filesystem accounting information: done
mke2fs -m 1 -L Data /dev/sd?4
mke2fs 1.18, 11-Nov-1999 for EXT2 FS 0.5b, 95/08/09
Filesystem label=Data
OS type: Linux
Block size=4096 (log=2)
Fragment size=4096 (log=2)
122112 inodes, 243964 blocks
12198 blocks (5.00%) reserved for the super user
First data block=0
8 block groups
32768 blocks per group, 32768 fragments per group
15264 inodes per group
Superblock backups stored on blocks:
32768, 98304, 163840, 229376
Writing inode tables: done
Writing superblocks and filesystem accounting information: done
mkswap /dev/sd?2 - Makes the Swap file.
Now your disk drive is partitioned and formatted for Linux! If you are a windows user, you can either proceed (recommended) using Linux (Ubuntu comes with FireFox already installed) or shut down the Linux distro you used, and make sure the boot disk pops out, as you wll need to get back to windows.
Notes
This tutorial has some confusing parts to it. Section 8 of the Windows method needs to be made more precise. It should be stated if the optware, swap, and data are all needed, how to pick the proper sizes for each, and if JFFs should not be used with this tutorial, the text that accompanies the pictures need to be changed to reflect this.
