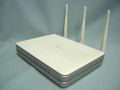
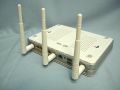
ASUS RT-N16
ASUS RT-N16 (A1)
Availability: common
Manuf (OEM/ODM): Arcadyan WG7127 F22-LF-ASU

Type: wireless router
FCC ID: MSQRTN16
IC ID: 3568A-RTN16
Power: 12 VDC, 1.25 A
Connector type: barrel
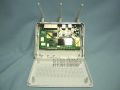
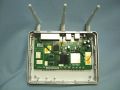
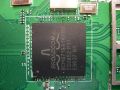
CPU1: Broadcom BCM4718A1 (480 MHz)
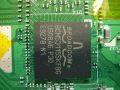
FLA1: 32 MiB33,554,432 B <br />262,144 Kib <br />32,768 KiB <br />256 Mib <br />0.0313 GiB <br /> (Macronix MX29GL256EHTI2I-90Q)
RAM1: 128 MiB134,217,728 B <br />1,048,576 Kib <br />131,072 KiB <br />1,024 Mib <br />0.125 GiB <br /> (Samsung K4N51163QZ-HC25 × 2)
Expansion IFs: Mini PCIe, USB 2.0
Mini PCIe slots: 1
USB ports: 2
JTAG: yes, 12-pin header, unpopulated, J1
Serial: yes, 4-pin header, populated, 3.3V TTL, J2
WI1 chip1: Broadcom BCM4718A1
WI1 802dot11 protocols: bgn
WI1 MIMO config: 2x3:2
WI1 antenna connector: U.FL, RP-SMA
ETH chip1: Broadcom BCM4718A1
Switch: Broadcom BCM53115S
LAN speed: 1GbE
LAN ports: 4
WAN speed: 1GbE
WAN ports: 1
bgn
Additional chips
2.4GHz RF Power Amplifier Module;SiGE;SE2528L;;2;
Stock bootloader: CFE 1.0.37 BCM947XX
Stock FW OS: Linux 2.6.22
TPFirmware supported: DD-WRT • (List), FreshTomato • (List | DLs), HGG (Hugo Gomes) (Merlin Fork), JBF (John Bacho) (Merlin Fork), LEDE Project (obsolete, OpenWrt) • (List), Oleg-ng (wl500g) • (List), OpenWrt • (List | Dev | DLs), TomatoUSB RAF (Victek) • (List | DLs), TomatoUSB • (List | DLs)
Default SSID: ASUS (97 addl. devices)
Default IP address: 192.168.1.1
the IP 192.168.1.1 is used by 1311 additional devices
of which 168 are ASUS devices
Default login user: admin
Default login password: admin
admin:admin credentials used by 1332 additional devices
of which 200 are ASUS devices
802dot11 OUI: 00:26:18 (-, 1 W), 20:CF:30 (4 E, 4 W), 48:5B:39 (1 E, 1 W)
Ethernet OUI: 00:26:18 (-, 1 W), 20:CF:30 (4 E, 4 W), 48:5B:39 (1 E, 1 W)
For a list of all currently documented Broadcom chipsets with specifications, see Broadcom.
Multi-Functional Gigabit Wireless N Router
Wikis
Reviews
- While the N16 is default clocked at 480MHz, the CPU is 533MHz capable.
Links of Interest
wl500g.info
- Specifications Asus RT-N16 on wl500g.info
- Asus RT-N16 256MB RAM + DualBand on wl500g.info
- EntWare firmware on wl500g.info
- DualWAN firmware on wl500g.info
DD-WRT
- ASUS RT-N16 now supported
- DD-WRT RT-N16 & Dual WAN
- 100 pages of RT-N16 post Condensed
- rt73usb + aircrack1.0
- 15407 & Higher USB drive mounting
- Is it possible to turn off the LEDs for RT-N16 with DD-WRT?
- Arcadyan may manufacture some of these devices
- (Success) ASUS RT-N16 + p910nd USB Printing
- Asus RT-N16 Load Equalization/Load Balance Help
Linksys.info
Flashing
| NOTE: During configuration or flashing a device, the only things that should be hooked to the device is the computer and power. |
Flashing DD-WRT
Flashing Tomato
Flashing OpenWrt
- openwrtwiki: toh/asus/rt-n16
Upgrading
Upgrading DD-WRT
- Download the firmware
- Do a factory reset in the GUI. Let the router reboot.
- Flash the downloaded firmware file through the router's GUI at http://192.168.1.1/
- After flashed, wait for the device to show the password change screen for DD-WRT.
- Do a Factory Reset to clear the NVRAM.
Reverting
Reverting to OEM Firmware from DD-WRT
- Download the latest ASUS firmware from asus's site.
- Rename the asus file from .trx to .bin
- go into the DD-WRT firmware upgrade page, set it to reset defaults, and select the ASUS firmware you renamed.
- After the flash finishes, and you see the ASUS GUI, do a Factory Reset to clear the NVRAM.
- Try to enjoy ASUS's firmware, and keep missing DD-WRT. (you can just flash back to dd-wrt if you ever want)
DD-WRT Recovery Mode
This router does have a recovery mode if ever needed for flashing, and to access it, press the reset button, then plug in power, and tftp the firmware you want to flash. Dont forget to do a Factory Reset in the GUI before and after every flash to make sure you dont have any nvram problems or conflicts.
Special thanks to Eko for making this possible!
JTAG-Serial Info
JTAG
JTAG Pinouts
 nTRST | 1o o2 | GND   | 6o | GND
   TDI | 3o o4 | GND   | 5o | ->
   TDO | 5o o6 | GND   | 4o | ->
   TMS | 7o o8 | GND   | 3o | ->
   TCK | 9o o10| GND   | 2o | ->
 nSRST |11o o12| N/C   | 1o | +VCC
 CPU JTAG [J1]          [J5]  Switch
 BCM4718                     BCM53115
Using Universal JTAG Adapter
 white | 1o o2 | black
   red | 3o o4 | GND
  blue | 5o o6 | GND
 green | 7o o8 | GND
yellow | 9o o10| GND
orange |11o o12| N/C
- /byte_mode switch required
DD-WRT JTAG Recovery
- Backup CFE x2 (Compare the files, they must match exactly or there is something wrong with your JTAG setup)
- Erase Wholeflash x2
- Flash CFE
- Unplug Power
- Unplug JTAG Cable
TFTP:
- Set Rig ip static 192.168.1.10
- Plug network cable from rig to port 1
- Get TFTP ready, server ip - 192.168.1.1, Password - blank, file - dd-wrt.v24-13527_NEWD-2_K2.6_mini_RT-N16.trx
- Plug in power
- As soon as windows says "connected" hit upgrade. May have to use a network hub to make sure windows is always connected.
- Hard Reset 30\30\30
Serial
Serial Pinouts
 F | VCC | 1o | R
 R |  RX | 2o | E
 O |  TX | 3o | A
 N | GND | 4o | R
 T |      [J2]
Hyper terminal Setup in Windows XP
In Windows XP, Click Start Button - All Programs - Accessories -
   Communication - HyperTerminal
Enter a name for the connection, Click ok
Choose com port you adapter is plugged into, Click ok
Set:
 Bits per second = 115200
 Data Bits = 8
 Parity = none
 Stop bits = 1
 Flow control = none
Click ok
Click File - Save As, and select a place to save it to so you
             don't have to enter the settings again.
Putty Setup in Windows XP
After installing putty, run it
 Serial line = The COM port your using for serial (ie. COM3)
 Speed = 115200
Click on Serial under Connection
 Serial line to connect to = same as above (Serial line)
 Speed (baud) = 115200
 Data bits = 8
 Stop bits = 1
 Parity = none
 Flow control = none
Click Session
 Enter a name for your connection under saved sessions
Click Save
Click Open
DD-WRT Serial Recovery
Modified redhawk0 instructions
- Connect Serial cable
- Start one of the programs from above
- Get TFTP ready with file selected
- Use dd-wrt.v24-13527_NEWD-2_K2.6_mini_RT-N16.trx
- Connect power to the router
- start a rapid fire Cntl-C as you plug the router to power
- type "nvram erase" w/o quotes, hit enter
- type "flash -noheader : flash1.trx" w/o quotes, this starts the tftp daemon, hit enter
- but have tftp.exe ready
- Click go or start on TFTP
- give it 5 minutes after it finishes
- then power cycle....Hard reset or 30/30/30...then config
- when it stops spitting out txt....hit the enter key...you should get a login prompt...
- at that point, power cycle it, hard reset...then config
- you'll see it boot up
USB Info
DD-WRT USB
- The USB port is where you can connect an external USB hard drive or flash drive.
- Which can do a multitude of things. You can use in as a NAS, storage for a FTP
- server, use Optware to run external programs like torrent software, samba for
- sharing files to network, share a USB printer with network...
- The list of possibilities is long, it just takes a little research.
- ProFTPd is included in most the newer builds of dd-wrt.
- Check the features chart to be sure.
Tomato
TomatoUSB comes with file sharing, ftp server and media server built in.
Tutorial: How to set up NAS and Optware on Tomato FOR TOTAL NOOBS
vlan Info
DD-WRT vlan Info
Per fggs, Reference: Routers that will and won't support VLAN
- Confirmed working on an Asus RT-N16 using 14929 K2.6 NEWD-2, I had to add the commands..
insmod switch-core
insmod switch-robo
and save as startup, after which
ls /proc/switch
Showed up, also as jumran mentioned, the webgui works thereafter the ins~ commands are saved to startup.
Edit: almost forgot...
1 2 3 4 | Case labels
4 3 2 1 | NVRAM ports
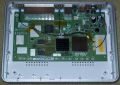
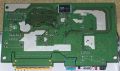
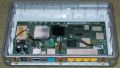
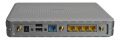
Pictures

Asus RT-N16
Asus RT-N16
Asus RT-N16
Asus RT-N16
Asus RT-N16

Asus RT-N16


Asus RT-N16 FCC
Asus RT-N16 FCC
Asus RT-N16 FCC
Asus RT-N16 FCC

Asus RT-N16 FCC

Asus RT-N16 FCC
Asus RT-N16 FCC
Asus RT-N16 FCC
Asus RT-N16 FCC
Asus RT-N16 FCC

Asus RT-N16 FCC

Asus RT-N16 FCC


Notes
DD-WRT Notes
Build 15407 and later
The devs of dd-wrt have removed the loading of file system drivers from the startup of the firmware.
- They are now loaded on demand with automount. Well, this presents a problem for those of us with
- USB HDD that automount doesn't detect. In order to load the file system drivers at startup you need
- to add the following to save startup in the commands tab.
For K2.6 builds only that have the modules already in place
insmod /lib/modules/2.6.24.111/kernel/fs/mbcache.ko
insmod /lib/modules/2.6.24.111/kernel/fs/ext2/ext2.ko
insmod /lib/modules/2.6.24.111/kernel/fs/jbd/jbd.ko
insmod /lib/modules/2.6.24.111/kernel/fs/ext3/ext3.ko
This loads the ext2 and ext3 file system drivers.
The mtd flash partitions
The factory firmware and the dd-wrt firmware use different partition schemes.
ASUS has 4 partitions:
0x00000000-0x00040000 : "boot"
0x00040000-0x01fe0000 : "linux"
0x001dff88-0x01fe0000 : "rootfs"
0x01fe0000-0x02000000 : "nvram"
dd-wrt has 5 :
0x00000000-0x00040000 : "cfe"
0x00040000-0x01fe0000 : "linux"
0x00187000-0x00720000 : "rootfs"
mtd: partition "rootfs" doesn't start on an erase block boundary – force read-only
0x01fe0000-0x02000000 : "nvram"
0x00720000-0x01fe0000 : "ddwrt"
likely the "linux" partition is not dd-wrt at all, but a remnant of the ASUS fw, as rootfs
- overlaps with it. in either case, the asus "boot" is binary identical to dd-wrt "cfe"
what does a functioning OpenWRT partition scheme look like?
Default vlans
nvram show | grep vlan.ports
vlan0ports=1 2 3 4 5*     <-- Eko says it causes no problems
vlan1ports=4 3 2 1 8*     <-- natted LAN
vlan2ports=0 8            <-- WAN
For newer 802.11n routers the variable vlan1ports equals to the natted LAN side while, vlan2ports refers
- to the WAN side. Was told by Eko not to worry about vlan0ports, that it didn't cause any problems.
Overclocking
By factory default the cpu is clocked at 480MHz and the Ram at 240MHz.
- Overclocking at CPU 532MHz / Ram 266 MHz can be achieved with these commands:
nvram set clkfreq=532,266
nvram commit
reboot
Note: some users have had overheating issues, so adding a fan may be a good idea if you want to try the overclocking.
Note: other instability issues may also arise from overclocking. Overclocking is NOT a good idea.
Note: See also Overclocking BCM 47xx CPU's for more info.
UPnP fix with swap on
If using SVN13450 (Eko Big) which still has swap enable option, you can
- manually enable UPnP with these commands in your start-up script:
nvram set wan0_primary=1
nvram commit
Current Known DD-WRT Issues and Bugs
- UPNP is currently not working for the RT-N16, so for now leave the feature disabled unless you want a full CPU Load. Fixed with SVN trac Changeset #13527
- Access Restriction with MAC-Filter doesn't work on Asus RT-N16. trac Ticket #1319(as of 12/18/09)
- On this router reset button will only bring you to recovery mode. If you wish to restore defaults, use wps button while plugging power in. Post By Eko
Personal Experiences
Dark_Shadow (This information was gathered when support was in its infancy, it's long outdated):
My current USB HDD, dd-wrt's automount doesn't mount. In Tomato USB it automounts fine.
- I have a HDD comming for another USB HDD enclosure. It's a Antec MX-1, we'll see how that one fairs.
Currently have 2x Western Digital My Book Essential 2TB.
It detected and automounted the drive, but only the first partition.
- Seems way to complicated to get the other partitions mounted.
Using My compiled (This was ages ago and I no longer have the buildand no longer compile) TomatoUSB build 54
- seems everything works so far (currentlty using Shibby builds). It also has a superior wireless signal.
Things I've tried thus far: (RT-N16)
- Firmware itself - Works
- Wireless radio - Works
- USB support - Works
- File sharing - Works
- Media Server - Works
- My custom firewall - Works
- Automatic script execution - Works
- Swap - Works
- Custom Theme/Skin for GUI - Works
- FernSpider:
With recommended DD-WRT build (14929M) on Asus RT-N16's I experienced the following issues:
- httpd daemon crashes (100% CPU) when https WAN management option is enabled. This problem has also been reported here and here and a ticket was raised here. However, even though the ticket was closed because the bug was deemed to have been "fixed", no details are given and it is not clear that it has actually been fixed. As the crash may take days to happen it is difficult to diagnose the problem and therefore devise a workaround.
- Access Restrictions do not work with unbridged virtual wireless interfaces. The problem appears to be due to a bug in the "Add Bridge" GUI code which adds a rule to the iptables FORWARD chain before the lan2wan chain reference which ACCEPT's all packets originating from the new bridge. As a consequence the access restrictions which apply to traffic on this bridge are rendered ineffective. This problem can be fixed via a firewall script which searches for firewall rules targeting packets originating from the added bridges and moving them further down the FORWARD chain.
Features that work well for me:
- Wireless Radio
- Custom Firewall
- Multiple WLAN's
- Separate WLAN's
- jffs
Hardware Modification
See also
- ASUS RT-N16UHP --Omega (talk) 19:17, 12 July 2016 (EDT)
